What’s up party people! ( there will also be a TLDR: post (click me!) that literally just shows setting up the droplet, command line basics for Nuxt.js, and will have a basic project running in like 10 mins, this series is meant to provide a little more detail into a more secure comprehensive set up to start with).
What is Nuxt.js?
In case you don’t know, Nuxt.js is a framework that can be used to create a Universal Vue.js Application. Why is that important? It allows you to create websites that are initially rendered server side (SSR) for the user, then transition into a Single Page Application (SPA). So you get all the SEO goodies you need, alongside a fast user experience.
To make that happen, we also need Node.js to do some heavy lifting for us. That is sometimes seen as a very complicated thing/scary/expensive thing to do. But fear not!
I’ll make sure this is cheap and easy to do!

Nuxt.js Hosting on Digital Ocean!
Use this link to get up and running. It will give a $100 dollar credit for 60 days, so you’re new set up won’t cost anything to start and test with!
After you’ve created an account, we will go through the following:
- Creating a new droplet
- Prepping your environment
- installing Nginx
- Node.js
- SSL
- basic firewall
Let’s get this rolling!
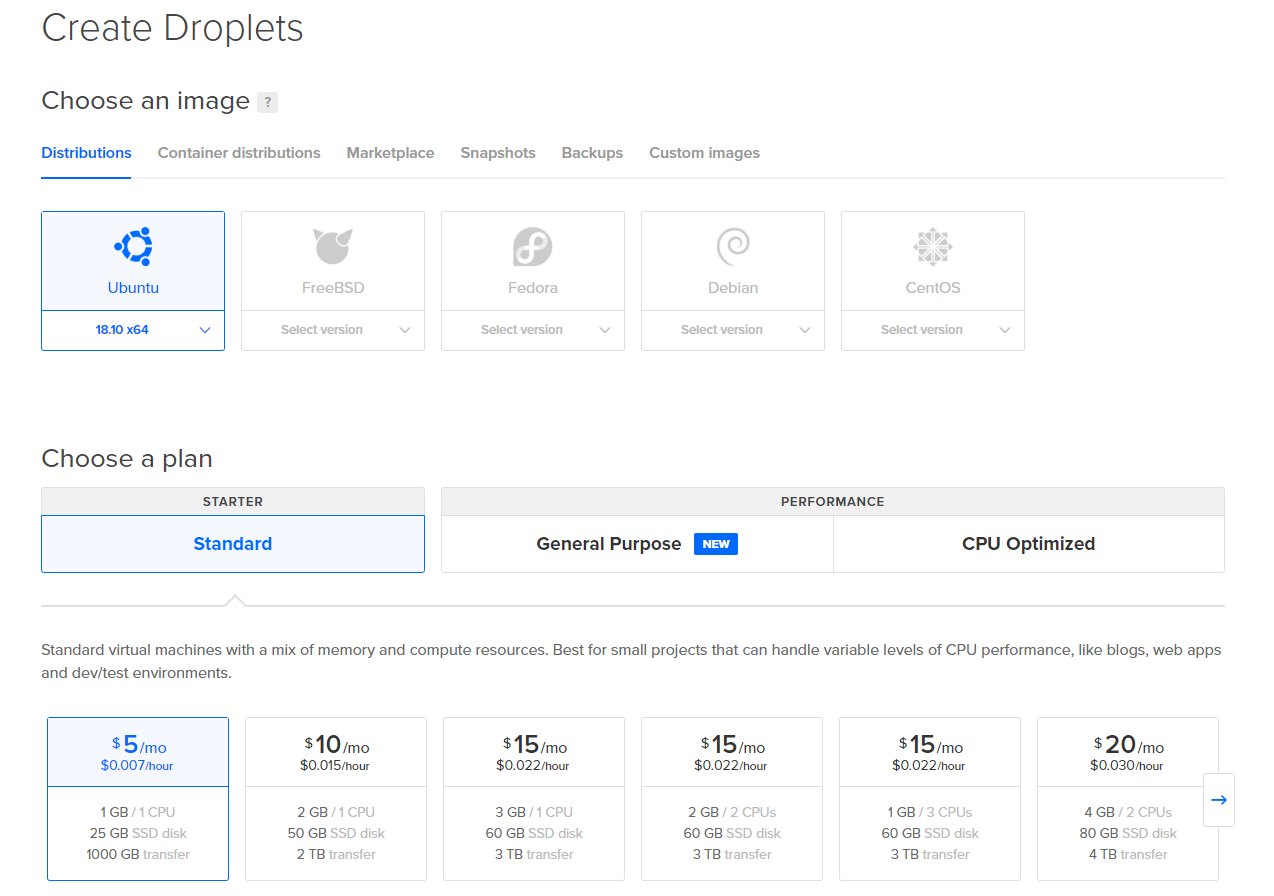
Creating your first Droplet
To start off you will only need a very simple VPS, and you’d be surprised how well this little thing will be able to run if you were to use it for additional testing or even a live demo.
You’ll want to grab the following:
- Ubuntu 18.10 x64
- Standard Plan
- and the 1GB / 1CPU for $5
You’ll then fill in the remaining information for which I am assuming the following:
- You’ll SSH into your server and stop there (we won’t be messing around as a new user or setting that up here, you can do it after if you like!)
- You’ll SSH in and that’s it to start!
Putting your environment together
We will be doing the following
Update packages List
sudo apt-get update
Install Node.js & NPM
curl -sL https://deb.nodesource.com/setup_12.x -o nodesource_setup.sh
You can change the “8” to 10 if you wish!
sudo bash nodesource_setup.sh
The PPA will be added to your configuration and your local package cache will be updated automatically. You can then install nodejs with the following:
sudo apt-get install -y nodejs
You can then the version of both Node.js and NPM with:
node -v

npm -v
From your home directory:
Create your project folder (you could name this anything, but in regards to step by step directions, we’ll just call it ‘project’ for this example)
mkdir ./project
You can then open a new window terminal to transfer your nuxt-create-app project to your newly created folder on your server (or, since your already using SSH, you could just using something WINSCP to drop the files in there (except node_modules) if you don’t want to use this command below)
scp -r /path/to/your/local/project/* your-user-name@<droplet-ip-here>:~/project/
Back in your previous terminal window, you’ll want to CD into that directory now
cd ./project
Install PM2 globally (this a node.js manager, and we’ll use to run your application and reload it for code updates!)
sudo npm install pm2 -g
(if you SSH into your folder through a file manager like WinSCP or a Mac equivalent, you’ll see the project files, this next part will also be easier if you’re in a file manager, so I’ll give you those directions first)
- create a releases folder
- in releases folder, create a v1.0.0 folder and move your project files into there!
- create in a symlink that links to your /releases/v1.0.0 (this symlink goes into your project folder root)
- from your terminal, in the ./project folder, run pm2 ecosystem
- this will generate an ecosystem.config.js
- copy the following into it
module.exports = {
    apps : [{
       name : 'your-project-name', // App name that shows in `pm2 ls`, the name you used to create your nuxt.js application
       exec_mode : 'cluster', // enables clustering
       instances : '2', // or an integer
       cwd : './current', // only if using a subdirectory
       "script": "npm",
       "args": "start"
    }]
};
This essentially says we are going to use PM2 to run our node.js application. It looks for the current directory (symlink you created), that points to your most current release
In the next part, we’ll go over running Nginx as your proxy server and setting up your SSL